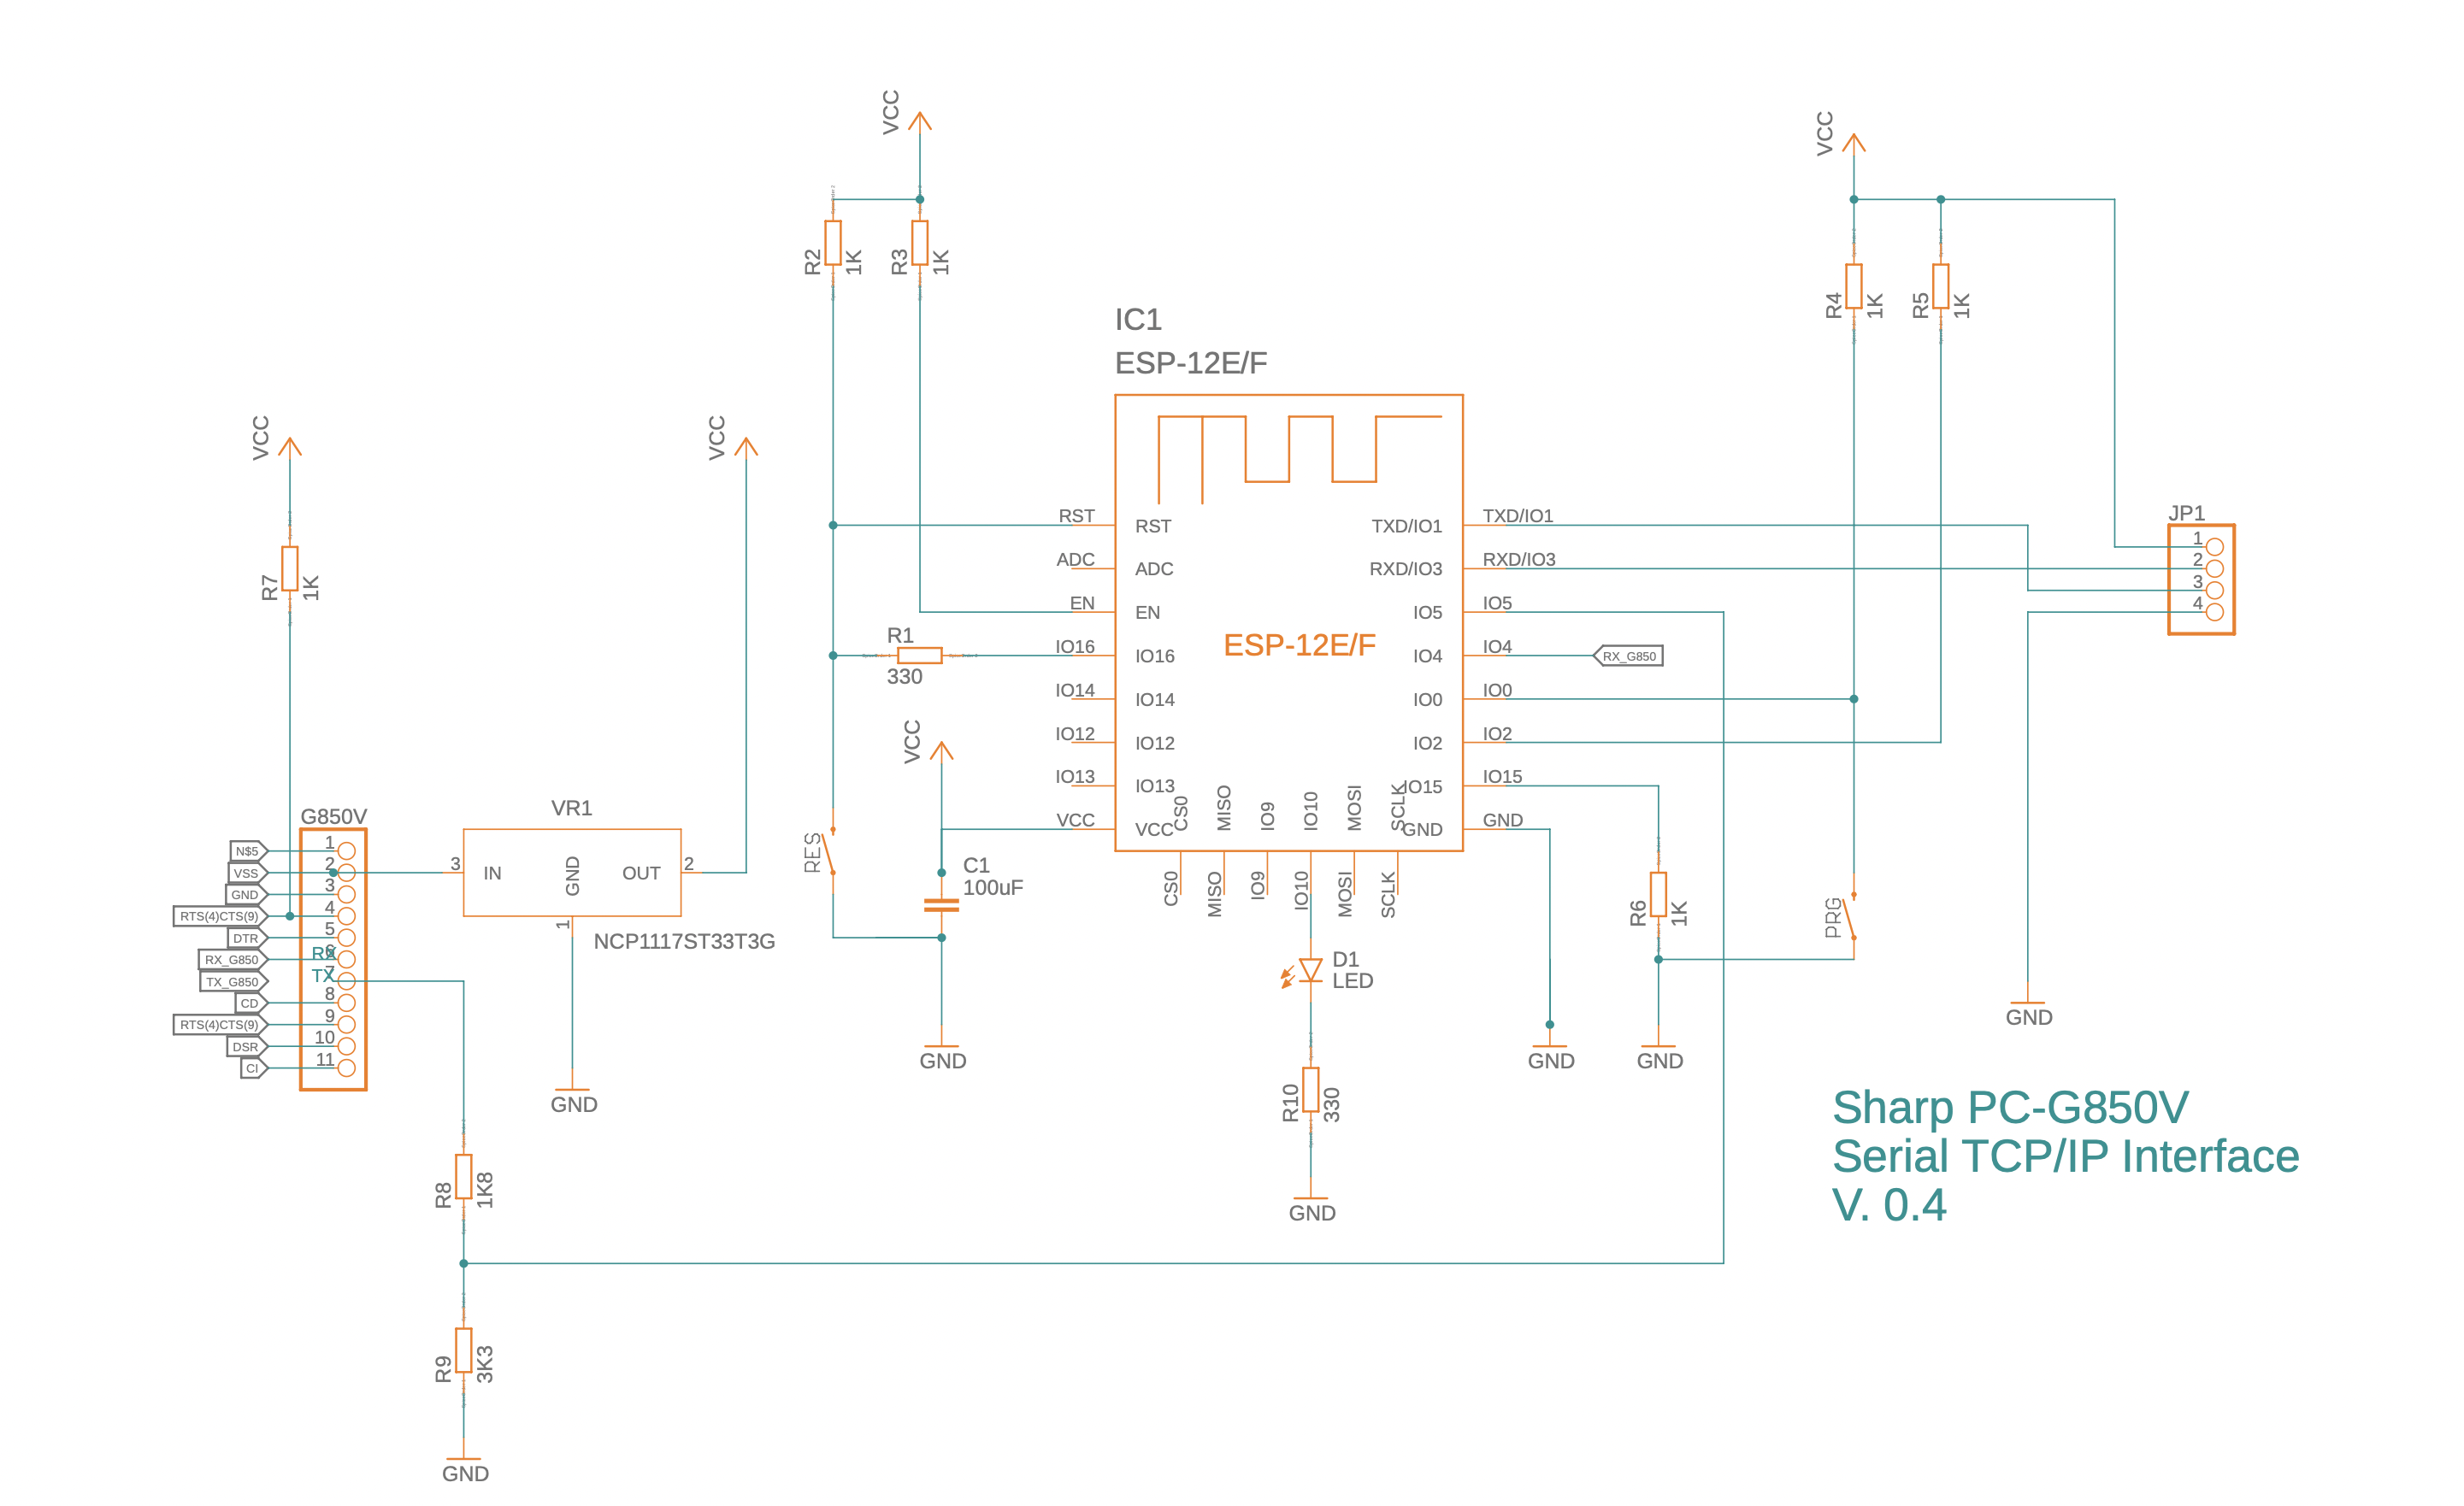
YAEP (Yet Another ESP Powered Project): An ESP8266-12 powered WiFi module for the Sharp Pocket Computer via the 11-pin connector connects wireless to PCs for transfer of programs and data.
The ESP8266 connects to your home WiFi or acts as an AP for initial configuration. The Serial port of the G850 becomes accessible via TCP on port 23. You can use telnet or netcat (nc) for simple direct transfers to/from the PC or use socat to create a virtual com port. The module supports 9600baud and shortens CTS/RTS and pulls these signals up to +5V, so you need to use XON for flow control.
Please note:
- The G850 uses inverted serial protocol logic levels (i.e. logical “high” is represented by a “low” (0V) TTL level, logical “low” is represented by a 5V TTL level. The ESP8266 uses the SoftSerial library on GPIO 4 and 5, which supports inverted logic levels
- Raw TCP is implemented without encryption on port 23. You can connect via telnet to receive or send data or programs but everyone on the same network can read the transferred data in clear text
- The module does only support serial port communication (i.e. it does not emulate the CE-126 synchronous communication for print and cassette tape commands)
- In the TEXT/Sio/Format menu enable 9600 baud, 8N1 and no flow-control. End-of-file “1A” allows the G850 to stop listening when receiving a file. You can still send files without the end-marker, but need to interrupt the “load” command by pressing “ON/BREAK”. The received text will be in the editor.
- Sleep timeout can be set. The module starts blinking befor it goes to sleep and pressing the PRG button resets the sleep timout.
- Some basic “AT” commands allow configuration changes without having to re-flash the module

Why not Bluetooth? I started out using a HC-06 BT module, but learned along the way that this module is no longer supported by Windows 10’s BT stack. After several hours of fruitless tests, I gave up and resorted first to an ESP32. However, the BT stack that implements a serial port pushes even the most bare-bone program beyond 1MB in size (thank you Espressif), so I opted for raw TCP instead.
I have not noticed that the WiFi module decreases battery life dramatically, especially since I implemented deep-sleep.

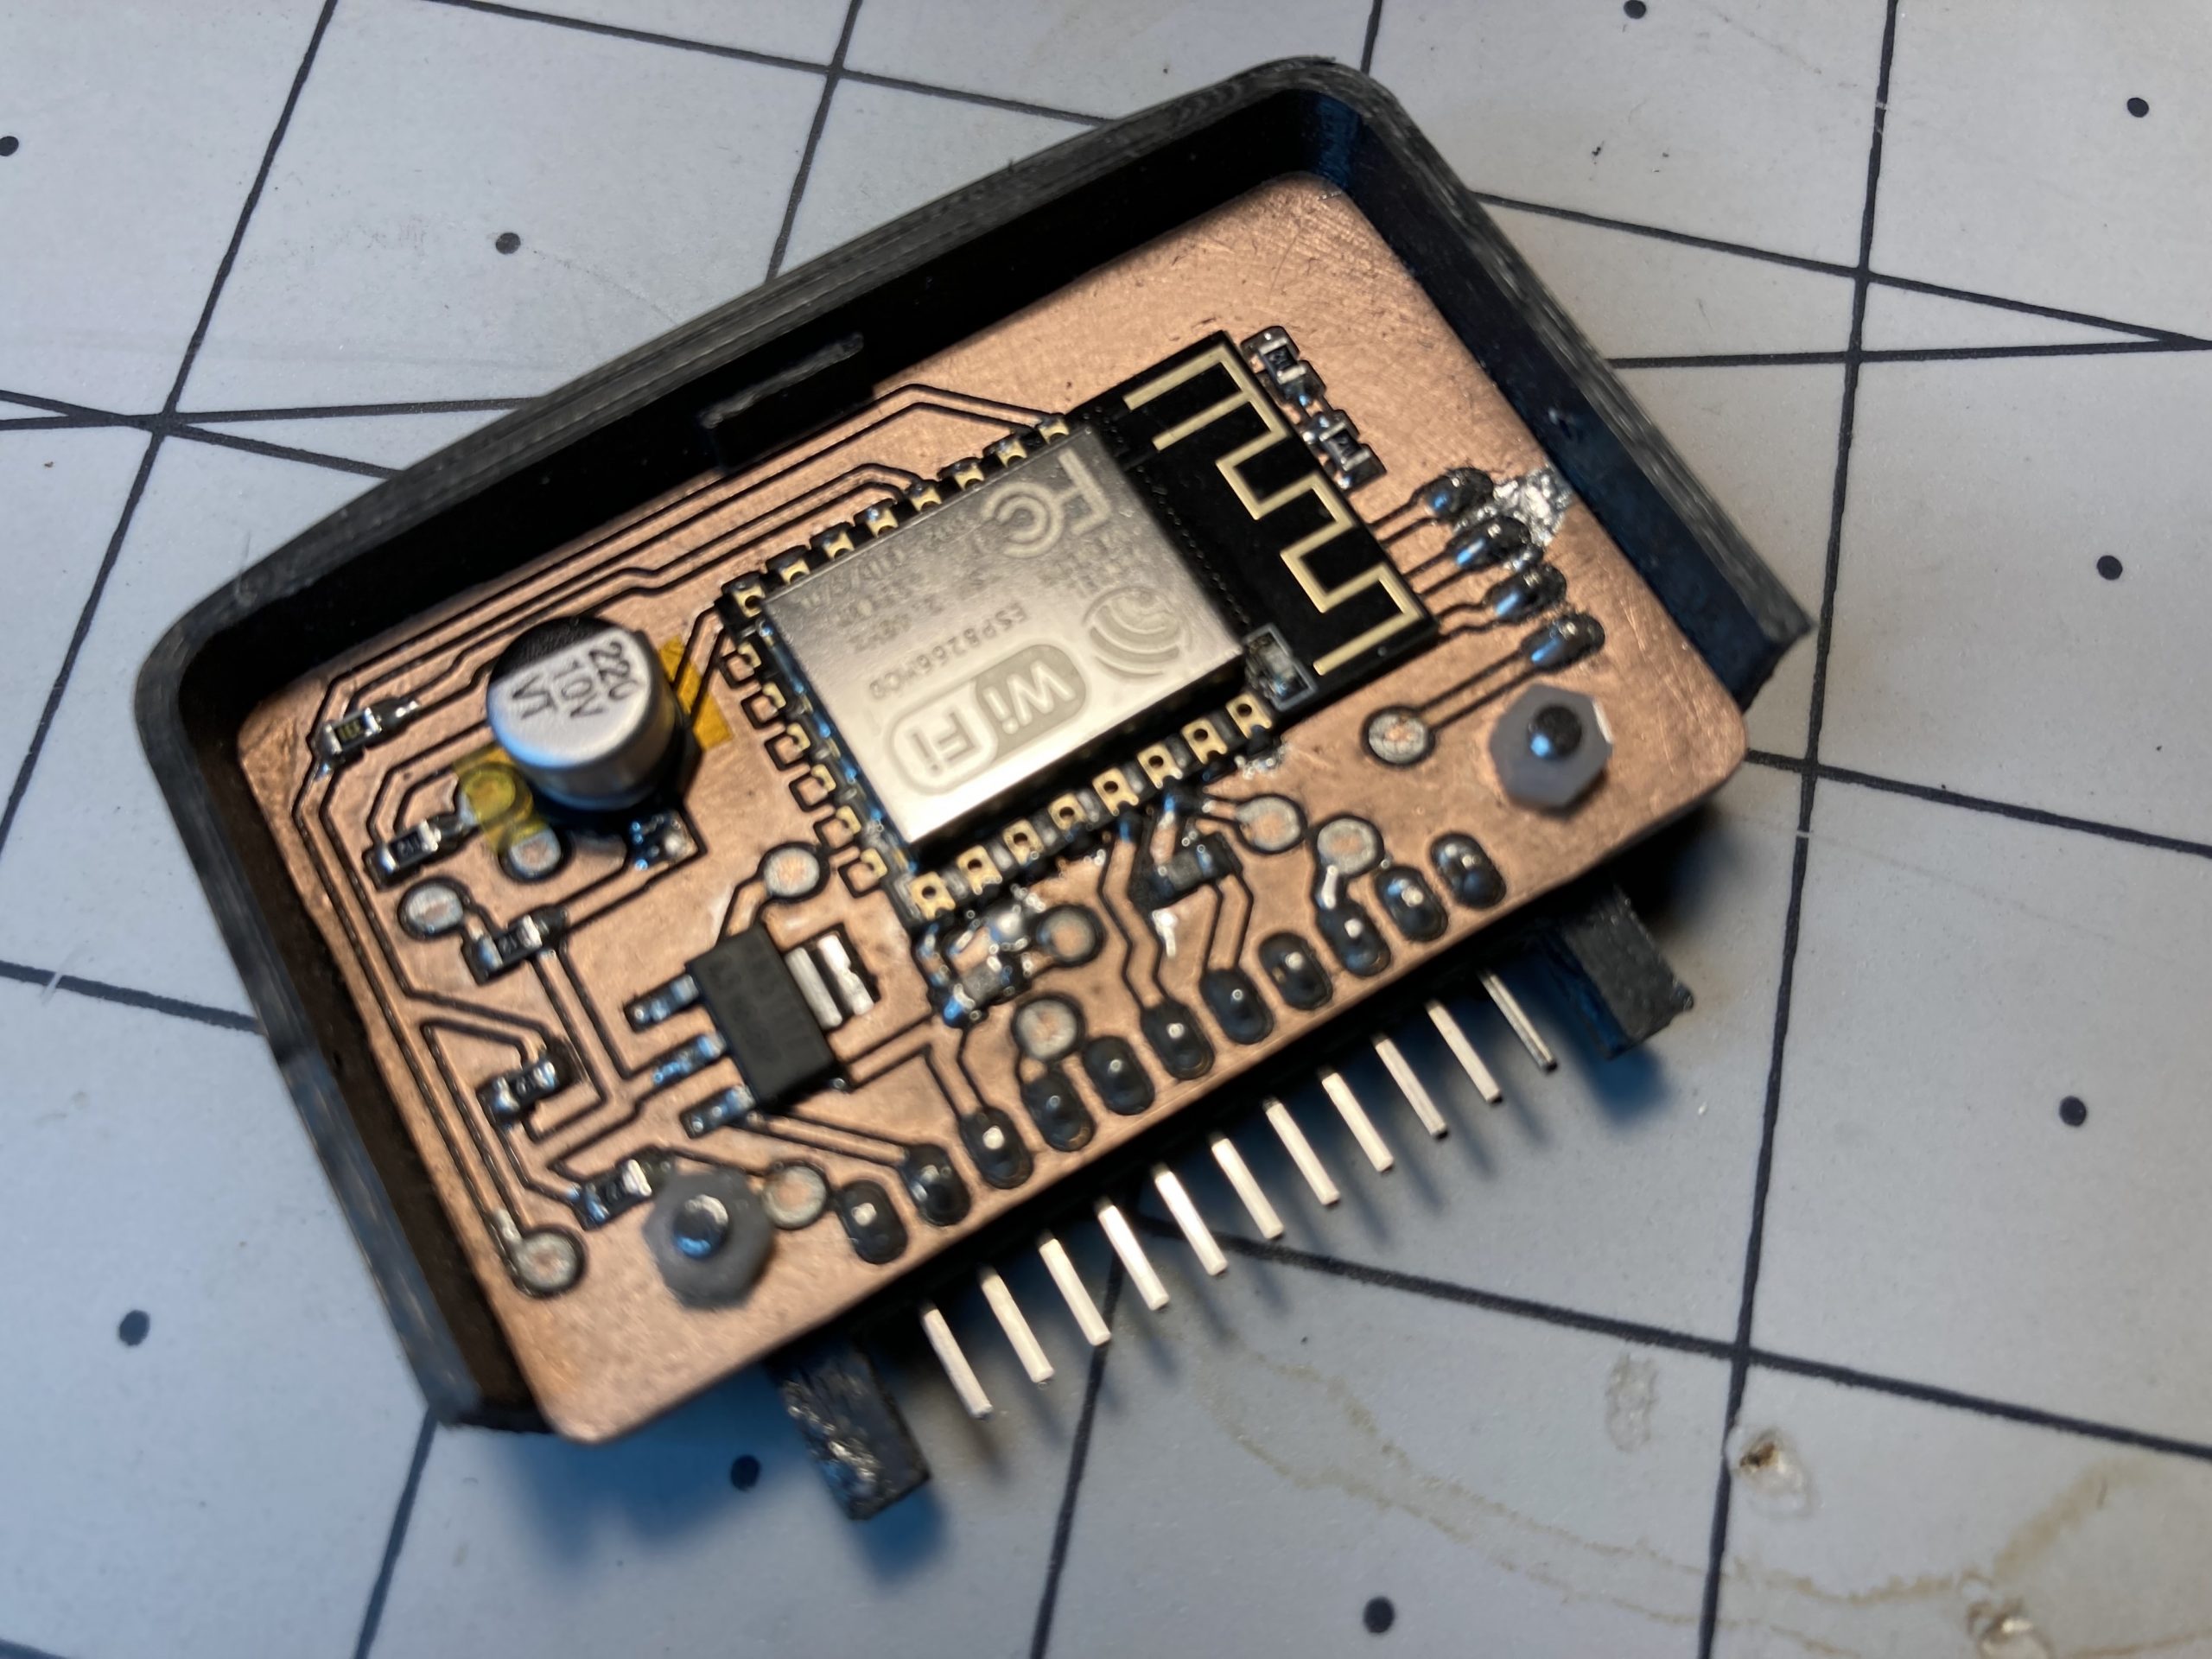
The module is a double sided PCB. I isolation-routed it with FlatCAM. Top-side is very much limited to traces and the two buttons, all vias can be manufactured with just copper wire (i.e. no through-hole rivets required) and all pins only need soldering on the bottom-side. You can find the EAGLE files at the end of this post.
The module consists of a double sided 1.5mm PCB, an ESP8266-12, a 3.3V voltage regulator, a 6x 1K, 2 x 330Ohms, 1 x 1.5K, 1 x 3K3 SMD resistors (0805 type), a 100uF capacitor, 1x LED (0805) and a 90 degree 11-pin header. The G850 connector and the case are 3D printed.
Disclaimer: I am not an electrical engineer. These projects are a way for me to learn and figure out ways to overcome the problems I encounter. By all means, if you have suggestions for doing things better, please let me know.
You can reach me on twitter at @ChrisHerman if you need help.
11-pin connector: A 3D part for the 11-pin connector which others may be able to re-use in their designs. The 2mm drill holes need to be positioned 200mil (5.08mm) above and below the connector and 100mil (2.54mm) in the orthogonal direction, away from the axis formed by the 11 pins (see picture below)


Sending and receiving files
To receive a file, plug-in the module (hostname of my module is G850V.local), type on the PC (OSX/Linux):
nc G850V.local 23>test.c
And on the G850 press TEXT, then S (for Sio) and S again (for Save).
Terminate nc with ^c on the PC
To send a file, first press TEXT, S (for Sio) and L (for load) on thje G850.
Then type on the PC:
nc G850V.local 23 <test.c
terminate nc with ^c on the PC
AT commands
Baudrate (1200..9600), WiFi settings and sleep timeout can be set via a small set of “+++AT+” commands. These commands can be sent from the G850 or via netcat ot telnet from your PC/Mac (of course, this will require your WiFi settings work). There’s also a “failsafe” configuration that can be selected when pressing the PRG button of the module for 5 sec:
+++AT+CFG?
+++AT+CFG={“rev”:1,”sleep”:60,”baud”:9600,”port”:23,”ssid”:”GUEST”,”wifipw”:”your_pw_here”,”host”:”G850V.local”,”otapw”:”myOTAPW”}
Example:
+++AT+CFG={“ssid”:”GUEST”,”wifipw”:”pw”}
this sets the SSID to “GUEST” and the wifi access point password to “pw”.
numeric configuration items:
rev: integer, referencing the version of the configuration. I recommend leaving at 1
sleep: seconds until unit goes into deep sleep
baud: baudrate for connection with G850 (600…9600)
port: TCP/IP port (use 23 for telnet compatibility)
string configuration items:
ssid: the ssid name of your wifi
wifipw: password of your wifi network
host: hostname for use when requesting an IP address
otapw: password for protrcting your ota passwords (use espota protocol)
+++AT+SAVE
Returns: OK
Saves current configuration as failsafe.ini to LittleFS Flash file system. Pressing the PRG button for longer than 5 sec will load failsafe.ini configuration and reboot. This allows you to recover from a messed-up config.ini (e.g. wrong wifi credentials).
+++AT+SLEEP
Returns: OK
Puts the adapter immediately into sleep. Pressing the RES button on the module will wake it up.
There is an issue with the ESP8266’s deep sleep behaviour, because regardless of all interrupt and wake-up sources being disabled, the
Resources (all in my github repository)
- Fusion360/Eagle schematics and board
- ESP8266 code
- PC-G850 sample program
- Jack W. Hsu’s Sharp PC-G850V(S) User’s Guide (specifically Appendix A – 11-pin Interface)